Mioplanet Pixel Ruler v4.0
Note: Jan 24, 2014 The mioplanet website is no more. Just Google/Bing to find pixel ruler. Lots of reputable software repeater sites carry their products including CNET http://m.download.cnet.com/Pixel-Ruler/3000-12565_4-75312528.html
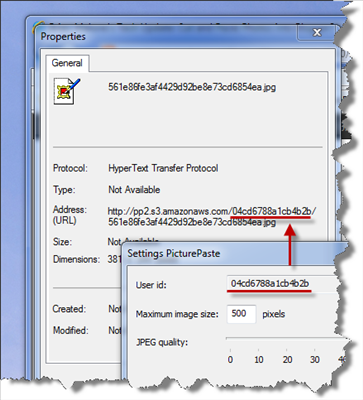
I have used Pixel Ruler from mioplanet for a few years now. As you mouse around a white box pops up with the position of your cursor in relation to the ruler ("49" in the image above.) A simple control on the left allows you to toggle between horizontal and vertical ruler position. Pixel Ruler does the job, but lacks nice-to-haves like snapping to on-screen objects, transparency and even marking positions on the ruler itself.
Pixel Ruler is free, but as of v4.0, a nag will appear at the 50th use to contribute $5.
Hexagora Window Ruler v1.1 r9
A few months ago, I rebuilt my laptop with Windows 7 and started reloading all of my tools. Since Pixel Ruler was several years old and essentially unchanged, I Binged around the internet in hopes that someone filled the feature vacuum left by Mioplanet. Enter Hexagora. The Hexagora "Window Ruler" is a quantum leap ahead of Pixel Ruler.
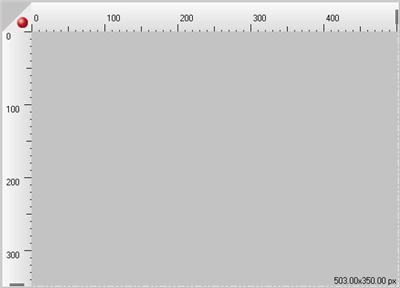
Window Ruler shows horizontal and vertical measurements simultaneously. While it does not show current mouse position, it allows quick resizing by dragging the ruler ends.
In a clever move, the join between horizontal and vertical rulers not squared (Fig 1). The missing right triangle coupled with the transparency make it very easy to line the ruler up with objects that are partially covered. White dashes complete the bottom and right legs of the rectangle. Window Ruler also has a handy snap feature. If you drag the red ball inside a window, the ruler will snap into position, automatically aligned with the window's edges.
A tray icon allows for quick activation/deactivation of the ruler with a left click. Right clicking opens up a menu of preset ruler sizes and quite possible the coolest feature - a screen shot. Window Ruler can screen capture the region immediately inside the ruler.
As with any application, there is room for improvement. The Pixel Ruler style mouse markers along the ruler would allow for quick mouse-point measurements. As it is, we have to resize the ruler to measure an object precisely. The measurement values inexplicably show decimal values to the hundredths when measuring pixels. Also, the tiny black numbers tend to disappear in the lower right hand corner. An option to move the numbers to the top of the horizontal ruler would be nice. Come to think of it, a few display options for the dashed lines and measurement values would be nice. 1) Turn off the dashed line and values, 2) show dashed line and values, 3) draw intersecting lines from each corner of the rectangle, and put the measurement values to the right of the intersection (see Fig 2). Finally, the screen capture feature grabs the dashed lines and the measurement values. I should be able to turn this off and capture image beneath the ruler only.
As it is, Window Ruler is a fantastic product. If you need quick on-screen measurements, it is a ridiculously convenient tool.
DISCLOSURE:
I am in no way affiliated with either Mioplanet, Hexagora or any other business with an interest in these companies or these products. In fact, I am not compensated in any way for my blog.
Pixel Ruler is free, but as of v4.0, a nag will appear at the 50th use to contribute $5.
Hexagora Window Ruler v1.1 r9
A few months ago, I rebuilt my laptop with Windows 7 and started reloading all of my tools. Since Pixel Ruler was several years old and essentially unchanged, I Binged around the internet in hopes that someone filled the feature vacuum left by Mioplanet. Enter Hexagora. The Hexagora "Window Ruler" is a quantum leap ahead of Pixel Ruler.
Window Ruler shows horizontal and vertical measurements simultaneously. While it does not show current mouse position, it allows quick resizing by dragging the ruler ends.
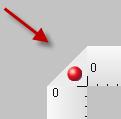
Fig 1. The upper left hand corner is left open for easy alignment of partially covered objects.
In a clever move, the join between horizontal and vertical rulers not squared (Fig 1). The missing right triangle coupled with the transparency make it very easy to line the ruler up with objects that are partially covered. White dashes complete the bottom and right legs of the rectangle. Window Ruler also has a handy snap feature. If you drag the red ball inside a window, the ruler will snap into position, automatically aligned with the window's edges.
A tray icon allows for quick activation/deactivation of the ruler with a left click. Right clicking opens up a menu of preset ruler sizes and quite possible the coolest feature - a screen shot. Window Ruler can screen capture the region immediately inside the ruler.
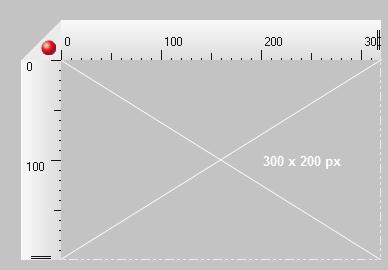
As with any application, there is room for improvement. The Pixel Ruler style mouse markers along the ruler would allow for quick mouse-point measurements. As it is, we have to resize the ruler to measure an object precisely. The measurement values inexplicably show decimal values to the hundredths when measuring pixels. Also, the tiny black numbers tend to disappear in the lower right hand corner. An option to move the numbers to the top of the horizontal ruler would be nice. Come to think of it, a few display options for the dashed lines and measurement values would be nice. 1) Turn off the dashed line and values, 2) show dashed line and values, 3) draw intersecting lines from each corner of the rectangle, and put the measurement values to the right of the intersection (see Fig 2). Finally, the screen capture feature grabs the dashed lines and the measurement values. I should be able to turn this off and capture image beneath the ruler only.
Fig 2. My concept of an alternate height x width display for Window Ruler
As it is, Window Ruler is a fantastic product. If you need quick on-screen measurements, it is a ridiculously convenient tool.
DISCLOSURE:
I am in no way affiliated with either Mioplanet, Hexagora or any other business with an interest in these companies or these products. In fact, I am not compensated in any way for my blog.